My Top 3 Favorite Features in Photoshop CS6

I have to say CS6 is not yet perfect. Even with the huge step on content-awareness, it still only works best on simpler backgrounds. And the video editing tool is cool, but its functions are pretty basic. It’s a good start though.
I still use Photoshop CS4 in the office at my day job as a graphic designer, and every time I go home to CS6, I can definitely feel the world of difference. Of the years that I’ve used Photoshop, I can say that CS6 is one of the largest leap forward in terms of features and usability. A lot of it’s new features are definitely geared towards making your work faster and easier, allowing you to focus more on creativity.
Upon first digging into Adobe Photoshop CS6, a few features have really popped out at me as incredibly useful. I would like to offer a brief overview of some of these new ways of attacking your creative challenges using the latest version of Adobe's flagship app. Ps CS6 will run you about $649 to buy it outright if you do not own any previous versions. If you own Photoshop 7, CS, or CS5, you are eligible for upgrade pricing - looks like $199 for the upgrade. Check Adobe's store on their website for more info. For more information about what comes in the different versions of CS6, and what your suite configuration options are, see my previous post.
My current favorite five new PsCS6 features in order are:
1. Nondestructive Smart Filters
2. Quick Selection Tool & Refine Edge
3. Photomerge with advanced alignment and blending
4. Automatic layer alignment and blending
5. Vanishing Point with adjustable angle
Feature Overviews:
* Nondestructive Smart Filters
Adobe has finally given us non-linear, nondestructive filters. Can I just say "HOORAY!" In the past, you applied filters and effects in a linear order: one filter would alter your image, and the second filter would alter your now altered image, and a third filter would alter the altered altered image. The problem with that workflow is that if you decide you want to slightly tweak the second filter, you'd have to either undo back to that point (losing your subsequent edits), or use the history palette to step directly "back in time" to the point before you added the second filter, add your "revised" second filter and then add your third manually. All too often, you don't quite remember what exact parameters you had set on that third one - or worse, your real world project involved applying 20 filters instead of the 3 in my example and changing the second filter would mean redoing the 18 that follow it. What a drag. Because of this issue, people developed many work arounds (often involving saving off multiple "partially completed" versions of files all over your hard drive with iterative file names, hoping that if you needed to go back to a certain point in time you'd be able to figure out where you needed to be), and while these workarounds were clever and well-conceived in many cases, there was a perfect, real solution, waiting to happen.
The real solution to all this is what we have been given in CS6: Nondestructive Smart Filters. In this new version, each filter and effect that you apply to a layer, remains live and continually re-editable, in real time, and the parameters that you adjust will all cascade down through whatever subsequent filters or effects you might have added to your layer. These are savable, movable, copy and pastable, and most importantly scalable.
* Quick Selection tool & Refine Edge
A design mentor of mine once told me "Photoshop is all about the selection. You select something, and then you do something with the selection. Nothing more, nothing less. Remember that, and you'll never go wrong using this app." Almost 10 years later, I must say she was absolutely correct. Using Photoshop is all about "the selection." There are more tools in Photoshop for selecting than for any other single task.
As in just about every version of Photoshop that has ever been released, CS6 has made even greater strides in the area of "making your selection" than comes to memory in recent years. The new Quick Selection Tool used in combination with the Refine Edge palette is about the most helpful and clean way of selecting the edges of an object in your image that I have ever seen. This new revised Quick Selection tool is so smooth. You basically set the parameters of your Quick Selection tool - as if it were a brush - and paint the general area of your image edges (like trying to select just a kid and his soccer ball out of the photo of the big game) and Photoshop is watching what you do, and interpreting what you consider to be the general edges of what you are wanting to select and it figures out what's kid and ball and what's grass and goal posts and sky and crowd and selects just what you want it to. It's VERY fast and clean. Then, you can invoke the Refine Edge palette, and you have seemingly infinite control over exactly how the edges of that selection behave. Check out the palette to the right to get an idea of what you could do to "refine" that edge. With radius, feathering, smoothing, and various display settings, I believe this new combo will cut down on my masking and selecting time in a quantifiable way.
* Photomerge with advanced alignment and blending
Ever tried to stitch together a series of images that you took, that you intended to "put together" into a panorama? Even with some of the stand alone tools that have been available over the years—even those for doing quicktime VR's—are clunky and difficult to use - with mixed results at times. I have always wanted something built into Photoshop to let me do these "photo merges" - I never expected that Photoshop would actually be able to automatically do it for me. This feature floored me. The technologies involved in my number four choice "Automatic layer alignment and blending" are at work here in this feature as well, and the new auto layer alignment features in CS6 are far-reaching and crop up again and again in different areas of the application. It's really one of the revolutionary things about this new version.
All of the things that have made making panoramas a difficult task in the past are all done automatically. The primary among these being 1. those times when you have to actually distort, rotate, skew or transform one of your elements because the perspective is screwy, 2. those times when the sun or lighting or a window made the white balance, color space or over all wash of brightness and contrast different from one image to the next (especially when doing 360's) and of course 3. actually finding and aligning those overlapping areas of consecutive elements. Photoshop CS6 does these all for you and with surprisingly amazing results. It's not just about the typical "panorama" either... I saw a demo of someone standing "too close" to a building, and taking pictures zoomed all the way out, of the front door, windows and window-boxes, front brick walk way, tilting upward and taking a picture of the balcony and roof line of the second floor - in other words, many elements that were WAY out of whack in terms of perspective, lighting and color space, and these 4 or 5 images were distorted, tweaked, rotated, matched, blended, lighting and color density matched... and I was amazed in like 5 seconds, there was this "wide angle" almost "fisheye" photomerge of the front of the building, from brick walkway to roof-line, and it looked incredible.
* Automatic layer alignment and blending
Another powerful application of this new alignment and blending technology is with a series or stack of images of the same subject. Let's say you wanted to take a picture of a statue in a park somewhere, or a huge fountain, or the front of a monument or building. There are always people walking through the frame - if you can't close down the area and still need a picture of the statue, in the park, in it's beautiful setting, but with no people or birds or random elements - what are you to do? In the past, it was a painstaking process of shooting a bunch of images, selecting the "closest" one to your vision of a nice, clean, tourist-less frame, and begin the hours and hours of painting, cloning, healing, brushing etc., to remove all of your "randoms." There are artists who are very good at this process, but I'm fairly certain they would agree that if there was a way to not have to spend all that time, they'd take it. Well, it's here. Photoshop CS6 can take your stack of images and by analyzing all of them, figure out which things are permanent (things that appear in all the images like that building in the distance, the big tree, the sidewalk, and which parts of the image are obscured in one of the frames but not all of them, are healed automatically by borrowing pixels from other images in the stack and building an advanced composite of all the images and doing 90% or more of the work for you. There's even a set of "fuzziness" sliders letting you say "eleminate things that are in X% of the images in the stack or less." This is so impressive to see in action. You have to try it on some of your own images. It's really hard to believe that it's this easy to do this sort of process now. This is one of those new areas that I'm sure we'll see artists finding incredibly creative ways to utilize this feature. Again, this one floored me when I first saw it.
* Vanishing Point with adjustable angle
One of the most powerful new features of Adobe CS5 was the vanishing point feature. One limitation it had was that you only had one set of right angles to work with in the vanishing point interface. Adobe took it one exponential step further by adding multiple, adjustable angle perspective planes to this vanishing point feature. What this enables you to do is copy, paste and clone in far more complex image planes than just the "clone parts of a building in perspective" job that the first iteration of this feature offered (impressive and powerful, but not very flexible). One of the big examples Adobe is pushing with this feature is to simulate 3D packaging and work on multiple planes at various angles in the same image. Like an open box for a new product, or even for experimenting with your final package art by seeing it in its real-world context. Again I think this feature has so many far reaching implications for inventors, prototypers, 3D modelers, visual effects artists... and can give Photoshop artists the ability to render full blown mockups of product packaging art for clients in a whole new way - getting us to sign-off, green-light and on to the next project at hand much more quickly. I like that a lot.


There are numerous new features in the application, especially when you dig down deep into the Photoshop Extended editions (sounds like a Peter Jackson DVD...) and as the week progresses here, I'd like to look into some of what PsCS3 Extended has to offer. The versions of PsCS3 that are available are the Film & Video, Medical & Science, AEC (Architecture, Engineering & Construction), and Manufacturing editions.
I have to say CS6 is not yet perfect. Even with the huge step on content-awareness, it still only works best on simpler backgrounds. And the video editing tool is cool, but its functions are pretty basic. It’s a good start though.
I still use Photoshop CS4 in the office at my day job as a graphic designer, and every time I go home to CS6, I can definitely feel the world of difference. Of the years that I’ve used Photoshop, I can say that CS6 is one of the largest leap forward in terms of features and usability. A lot of it’s new features are definitely geared towards making your work faster and easier, allowing you to focus more on creativity.
Upon first digging into Adobe Photoshop CS6, a few features have really popped out at me as incredibly useful. I would like to offer a brief overview of some of these new ways of attacking your creative challenges using the latest version of Adobe's flagship app. Ps CS6 will run you about $649 to buy it outright if you do not own any previous versions. If you own Photoshop 7, CS, or CS5, you are eligible for upgrade pricing - looks like $199 for the upgrade. Check Adobe's store on their website for more info. For more information about what comes in the different versions of CS6, and what your suite configuration options are, see my previous post.
My current favorite five new PsCS6 features in order are:
1. Nondestructive Smart Filters
2. Quick Selection Tool & Refine Edge
3. Photomerge with advanced alignment and blending
4. Automatic layer alignment and blending
5. Vanishing Point with adjustable angle
Feature Overviews:
* Nondestructive Smart Filters
Adobe has finally given us non-linear, nondestructive filters. Can I just say "HOORAY!" In the past, you applied filters and effects in a linear order: one filter would alter your image, and the second filter would alter your now altered image, and a third filter would alter the altered altered image. The problem with that workflow is that if you decide you want to slightly tweak the second filter, you'd have to either undo back to that point (losing your subsequent edits), or use the history palette to step directly "back in time" to the point before you added the second filter, add your "revised" second filter and then add your third manually. All too often, you don't quite remember what exact parameters you had set on that third one - or worse, your real world project involved applying 20 filters instead of the 3 in my example and changing the second filter would mean redoing the 18 that follow it. What a drag. Because of this issue, people developed many work arounds (often involving saving off multiple "partially completed" versions of files all over your hard drive with iterative file names, hoping that if you needed to go back to a certain point in time you'd be able to figure out where you needed to be), and while these workarounds were clever and well-conceived in many cases, there was a perfect, real solution, waiting to happen.
The real solution to all this is what we have been given in CS6: Nondestructive Smart Filters. In this new version, each filter and effect that you apply to a layer, remains live and continually re-editable, in real time, and the parameters that you adjust will all cascade down through whatever subsequent filters or effects you might have added to your layer. These are savable, movable, copy and pastable, and most importantly scalable.
* Quick Selection tool & Refine Edge
A design mentor of mine once told me "Photoshop is all about the selection. You select something, and then you do something with the selection. Nothing more, nothing less. Remember that, and you'll never go wrong using this app." Almost 10 years later, I must say she was absolutely correct. Using Photoshop is all about "the selection." There are more tools in Photoshop for selecting than for any other single task.
As in just about every version of Photoshop that has ever been released, CS6 has made even greater strides in the area of "making your selection" than comes to memory in recent years. The new Quick Selection Tool used in combination with the Refine Edge palette is about the most helpful and clean way of selecting the edges of an object in your image that I have ever seen. This new revised Quick Selection tool is so smooth. You basically set the parameters of your Quick Selection tool - as if it were a brush - and paint the general area of your image edges (like trying to select just a kid and his soccer ball out of the photo of the big game) and Photoshop is watching what you do, and interpreting what you consider to be the general edges of what you are wanting to select and it figures out what's kid and ball and what's grass and goal posts and sky and crowd and selects just what you want it to. It's VERY fast and clean. Then, you can invoke the Refine Edge palette, and you have seemingly infinite control over exactly how the edges of that selection behave. Check out the palette to the right to get an idea of what you could do to "refine" that edge. With radius, feathering, smoothing, and various display settings, I believe this new combo will cut down on my masking and selecting time in a quantifiable way.
* Photomerge with advanced alignment and blending
Ever tried to stitch together a series of images that you took, that you intended to "put together" into a panorama? Even with some of the stand alone tools that have been available over the years—even those for doing quicktime VR's—are clunky and difficult to use - with mixed results at times. I have always wanted something built into Photoshop to let me do these "photo merges" - I never expected that Photoshop would actually be able to automatically do it for me. This feature floored me. The technologies involved in my number four choice "Automatic layer alignment and blending" are at work here in this feature as well, and the new auto layer alignment features in CS6 are far-reaching and crop up again and again in different areas of the application. It's really one of the revolutionary things about this new version.
All of the things that have made making panoramas a difficult task in the past are all done automatically. The primary among these being 1. those times when you have to actually distort, rotate, skew or transform one of your elements because the perspective is screwy, 2. those times when the sun or lighting or a window made the white balance, color space or over all wash of brightness and contrast different from one image to the next (especially when doing 360's) and of course 3. actually finding and aligning those overlapping areas of consecutive elements. Photoshop CS6 does these all for you and with surprisingly amazing results. It's not just about the typical "panorama" either... I saw a demo of someone standing "too close" to a building, and taking pictures zoomed all the way out, of the front door, windows and window-boxes, front brick walk way, tilting upward and taking a picture of the balcony and roof line of the second floor - in other words, many elements that were WAY out of whack in terms of perspective, lighting and color space, and these 4 or 5 images were distorted, tweaked, rotated, matched, blended, lighting and color density matched... and I was amazed in like 5 seconds, there was this "wide angle" almost "fisheye" photomerge of the front of the building, from brick walkway to roof-line, and it looked incredible.
* Automatic layer alignment and blending
Another powerful application of this new alignment and blending technology is with a series or stack of images of the same subject. Let's say you wanted to take a picture of a statue in a park somewhere, or a huge fountain, or the front of a monument or building. There are always people walking through the frame - if you can't close down the area and still need a picture of the statue, in the park, in it's beautiful setting, but with no people or birds or random elements - what are you to do? In the past, it was a painstaking process of shooting a bunch of images, selecting the "closest" one to your vision of a nice, clean, tourist-less frame, and begin the hours and hours of painting, cloning, healing, brushing etc., to remove all of your "randoms." There are artists who are very good at this process, but I'm fairly certain they would agree that if there was a way to not have to spend all that time, they'd take it. Well, it's here. Photoshop CS6 can take your stack of images and by analyzing all of them, figure out which things are permanent (things that appear in all the images like that building in the distance, the big tree, the sidewalk, and which parts of the image are obscured in one of the frames but not all of them, are healed automatically by borrowing pixels from other images in the stack and building an advanced composite of all the images and doing 90% or more of the work for you. There's even a set of "fuzziness" sliders letting you say "eleminate things that are in X% of the images in the stack or less." This is so impressive to see in action. You have to try it on some of your own images. It's really hard to believe that it's this easy to do this sort of process now. This is one of those new areas that I'm sure we'll see artists finding incredibly creative ways to utilize this feature. Again, this one floored me when I first saw it.
* Vanishing Point with adjustable angle
One of the most powerful new features of Adobe CS5 was the vanishing point feature. One limitation it had was that you only had one set of right angles to work with in the vanishing point interface. Adobe took it one exponential step further by adding multiple, adjustable angle perspective planes to this vanishing point feature. What this enables you to do is copy, paste and clone in far more complex image planes than just the "clone parts of a building in perspective" job that the first iteration of this feature offered (impressive and powerful, but not very flexible). One of the big examples Adobe is pushing with this feature is to simulate 3D packaging and work on multiple planes at various angles in the same image. Like an open box for a new product, or even for experimenting with your final package art by seeing it in its real-world context. Again I think this feature has so many far reaching implications for inventors, prototypers, 3D modelers, visual effects artists... and can give Photoshop artists the ability to render full blown mockups of product packaging art for clients in a whole new way - getting us to sign-off, green-light and on to the next project at hand much more quickly. I like that a lot.
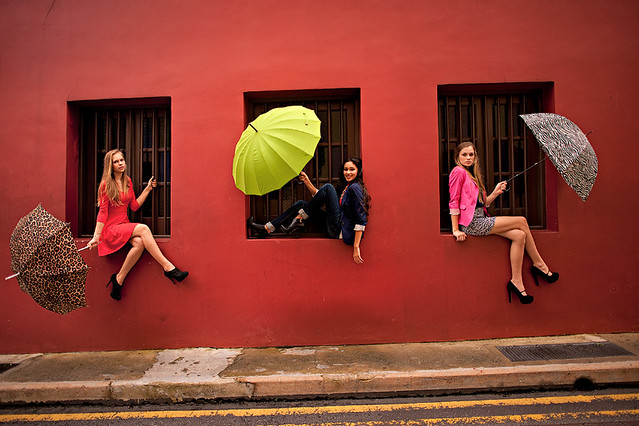
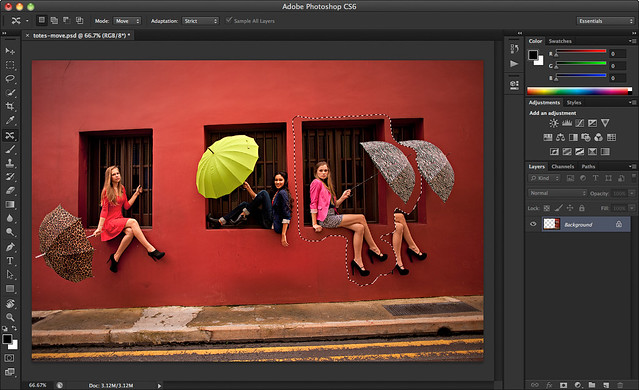
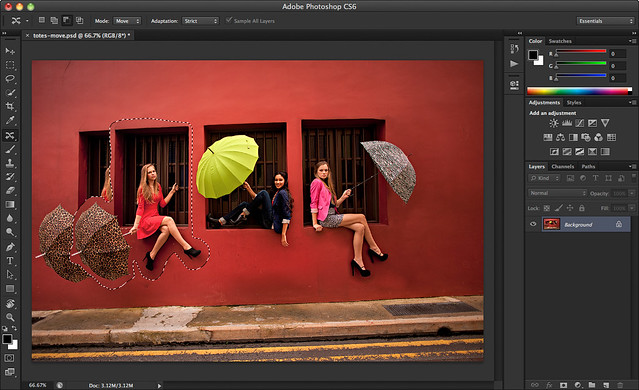
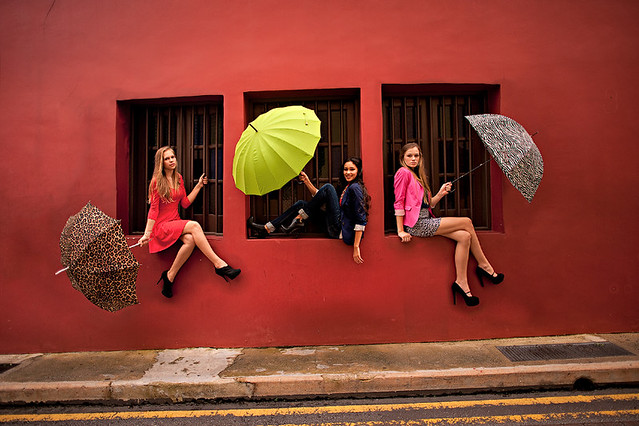
1) CONTENT-AWARE MOVE
One of the most impressive features in this version is the content-aware move. I shot this photo (below) in a recent project, and I remember the client wanted me to move the girls closer together. With content-aware move, all I have to do was select the object… and well, move.
I have to admit, this was one of the features in my wishlist that I didn’t really expect to materialize. I do have to mention though that it works best on photos with simpler backgrounds. And if you’re one to pixel peep, you will find some warped textures resulting from the move, but this is easily remedied by the heal tool.
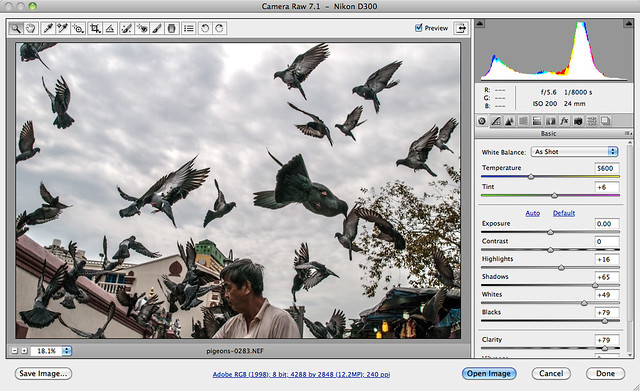
2) ADOBE CAMERA RAW 7
I was wandering around an area in Chinatown beside a Hindu temple filled with loitering pigeons… when suddenly, this old man walked in the middle of the street and threw a handful of rice grains. The pigeons went crazy.. and with no regard to my camera’s settings, I just tried to snap as much photos and as quickly as I could. Unfortunately, the photos came out totally under exposed:
Fortunately, with extended controls in Adobe Camera Raw 7.0 on highlights and shadows, I’m able to bring out the details in the shot.
So now you can worry less about getting the exposure right in sudden unexpected situations like this… just focus on composing and capturing the moment.
Oh and yeah, this is the main reason why I prefer shooting in RAW.
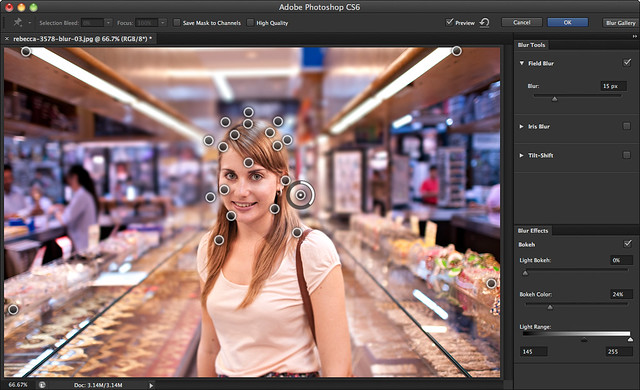
3) SELECTIVE BLURRING
I’m not a big fan of simulating bokeh or background blur in photoshop because it never comes out right. But with the new ‘Field Blur’ function, you can select multiple points from an image and dictate the amount of blur or (non-blur) for each point. If you have a good understanding on how bokeh works, with careful analysis, you can simulate better background blur thus making your portrait subject stand out more naturally.
This is a portrait I took on a past client project. For this shot, I used a 24mm lense wide open at f1.4. Although I’m happy with the shot, I sort of wished there was a bit more blur in the background to make the subject stand out more.
I used photoshop CS6′s field blur function to select several points to blur and points to not blur.
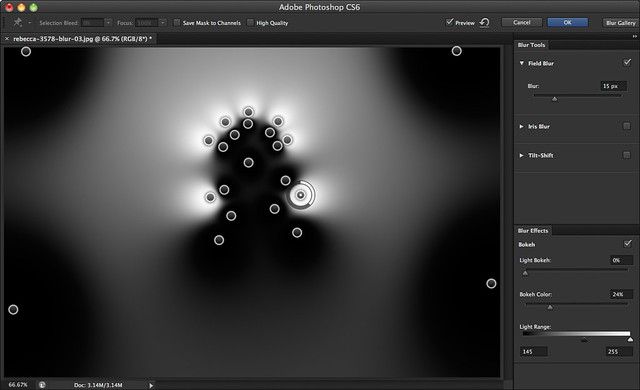
This is a preview of the blur mask. Areas in white are in blur, areas in black are not.
Although this is not perfect, and I still prefer bokeh straight out of the camera, it’s nice to know this kind of feature exist in case you’ll need it for some few quick tweaks.
OTHER COOL FEATURES:
The features I listed above are only some of the new features and upgrades in Adobe’s latest Photoshop release. There’s a whole slew of new stuff which I think make this upgrade probably the most significant one so far through the years.
The features I listed above are only some of the new features and upgrades in Adobe’s latest Photoshop release. There’s a whole slew of new stuff which I think make this upgrade probably the most significant one so far through the years.
New User Interface – This was the very first thing I noticed… and I instantly fell in love with it. I love the dark background, I think it gives focus to the image in hand.
Adaptive Wide Angle – Another awesome new feature. It’s not a personal fave though, since I don’t do landscapes. But photographers who use an ultra-wide angle or fisheye lens will get a kick out of these.
New Cropping Workflow – This is another pretty significant upgrade. The previous workflow makes it hard to preview your angled crops… now, they’ve applied the same cropping workflow as with Lightroom. Plus, they introduced the option to not delete the cropped pixels. Which means cropping is not non-destructive!
Edit Video – This is not meant to replace video editing software like Adobe Premier or After Effects. In fact, the controls are pretty basic. But I’ve played around with it and it’s a pretty nifty feature for some quick editing. And it’s a good start.
Auto-Save – I’ve been burned so many times for not saving more often than I should. I’ve had my share of recreating complicated digital work because of system failures – auto save is a potential hero.
I have to say CS6 is not yet perfect. Even with the huge step on content-awareness, it still only works best on simpler backgrounds. And the video editing tool is cool, but its functions are pretty basic. It’s a good start though.
I still use Photoshop CS4 in the office at my day job as a graphic designer, and every time I go home to CS6, I can definitely feel the world of difference. Of the years that I’ve used Photoshop, I can say that CS6 is one of the largest leap forward in terms of features and usability. A lot of it’s new features are definitely geared towards making your work faster and easier, allowing you to focus more on creativity.
There are numerous new features in the application, especially when you dig down deep into the Photoshop Extended editions (sounds like a Peter Jackson DVD...) and as the week progresses here, I'd like to look into some of what PsCS3 Extended has to offer. The versions of PsCS3 that are available are the Film & Video, Medical & Science, AEC (Architecture, Engineering & Construction), and Manufacturing editions.