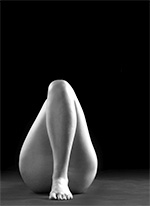
Banhegyesy Antal


Banhegyesy Antal
I’ve not been quite so assiduous in buying Black and White Photography magazine this year. It only seems to be at the bigger WH Smiths in railway stations, and for some reason I’ve not passed through casually or nipped into town to pick up a copy. Or maybe it’s that when I do catch a train home , my iPad means I already have plenty to read and just want to sit down and resume my Nordic noir or that Steve Jobs biog? Anyway, I do still love my b&w and yesterday after enjoying a grown up pint with my nephew (at a great discovery called The Speaker in Westminster) I wandered over to Waterloo station and was glad to see the magazine’s not gone under.

In fact, it was particularly full of great b&w thanks to their BWPOTY (do such acronyms need to be written in full) and my favourite was a series of studio nudes by Banhegyesy Antal. It turns out he’s Hungarian and I very much enjoyed his site – even if there’s only a thumbnail of the picture that really caught my eye (legs in the air, her knickers strung between). Well worth a visit, well worth getting buying Black and White Photography magazine again.

What is Adobe Photoshop Touch?


What is Adobe Photoshop Touch?

Adobe® Photoshop® Touch, a new Adobe Touch App, lets you quickly combine images, apply professional effects, and share the results with friends and family through social networking sites like Facebook — all from the convenience of your iPad or Android™ tablet.¹

Screenshot gallery

Highlights

  1. See your images like never before with Retina display.
  2. Work on files up to 12 megapixels with higher resolution capabilities.
  3. Work with core Photoshop tools designed for tablets.
  4. Use your tablet camera to fill area on a layer.
  5. Select part of an image to extract by scribbling.
  6. Perform Google searches and share images on Facebook right in the app.
  7. Sync files to Adobe Creative Cloud™ and open them in Photoshop.²

Creativity anywhere

ps-touch-create-anywhere-147x83

Work with images on your tablet, and then take them further on your PC or Mac in Photoshop. Sync your projects with Adobe Creative Cloud and open layered files from Adobe Photoshop Touch in Photoshop.²

What's new in Photoshop?


What's new in Photoshop?
Adobe® Photoshop® CS6 software delivers even more image editing power, new creative options, and the Adobe Mercury Graphics Engine for blazingly fast performance. Retouch with new Content-Aware features, and create superior designs as well as movies using new and reimagined tools and workflows.*


Upgrade to Photoshop CS6 for greater speed, power, and productivity. A fresh, elegant interface features groundbreaking design tools like Content-Aware Patch, a new Blur Gallery, a faster and more precise Crop tool, and intuitive video creation. Or become an Adobe Creative Cloud™† member to also get over a dozen new features, including new Smart Object support for Blur Gallery and Liquify, export of text and shape styling as CSS, and other new features exclusively in Creative Cloud.*

Adobe software activation


Adobe software activation
When you license a software product from Adobe, you are issued an Adobe serial number that represents your license to use that software. Activation is the process by which Adobe validates that your software and serial number are genuine and that they are being used in accordance with the license you purchased. Activation is intended to protect your rights, as a consumer, to use the license to its full extent, and it is also intended to protect Adobe's rights as a software developer. Only genuine Adobe software entitles you to critical updates and technical support. You may not be able to use certain versions of Adobe software if it is not activated.

During the Activation process, information about the following is sent to Adobe via an Internet connection: your computer, your computer's operating system, the Adobe software in use on your computer, the Adobe serial number associated with that software, and your Adobe ID. In addition, Adobe receives the Internet Protocol address of your Internet connection. All the foregoing information is collectively referred to as the "Received Information" and is stored by Adobe. Adobe may use the Received Information, alone or in conjunction with other information you or third parties have provided to Adobe, to detect and prevent fraud and abuse of Adobe products and services, such as the use of Adobe software that is not validly licensed or that is not being used in accordance with a valid license.

If your software fails to activate, either because it cannot connect to Adobe over the Internet or because its use is not permitted, it may offer only limited functionality or not operate at all.

ADOBE® CREATIVE SUITE® 6 AND OTHER RECENT RELEASES OF ADOBE SOFTWARE

An Internet connection and registration will be required for software activation. Registration and activation can be completed either at installation or within seven days of product launch; otherwise, the product will stop working.

Design an Interesting Cloud Text Effect in Photoshop


Design an Interesting Cloud Text Effect in Photoshop


In this tutorial, I will show you the steps I took to Design an Interesting Cloud Text Effect in 3 Easy Steps in Photoshop. We will mainly use custom brushsets and utilise brush options to achieve this text effect. This is a beginner level tutorial, have a try :)
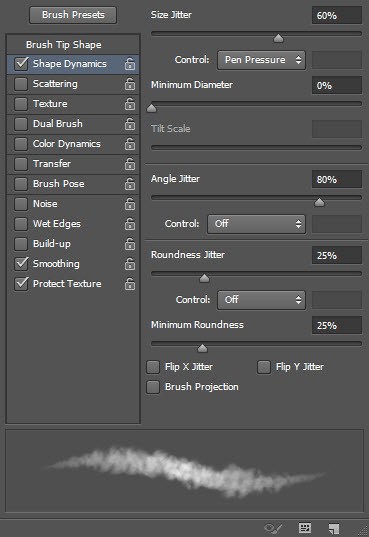
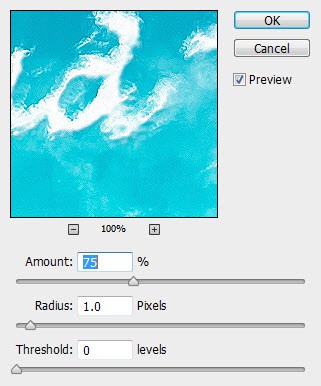
Note: The Photoshop tutorial is done in CS6 – therefore some screenshot may have slighting different layout as in the earlier version. Some brushes are exclusive to Photoshop CS6.Here is a preview of the final effect I have for this tutorial: (click to enlarge)cloud text flatten1 500x250 Design an Interesting Cloud Text Effect in PhotoshopPSD File DownloadYou can download the PSD File for this tutorial via the VIP Members Area for only $6.95/Month (or less)! You will not only get this PSD File, but also 100+ other PSD Files + Extra Goodies + Exclusive Photoshop tutorials there. Signup now and get exclusive :) Find out more about the VIP Members Areasvip sign up 250 Design an Interesting Cloud Text Effect in PhotoshopOK Let’s get started!To complete this tutorial, you will need the following stocks:Cloud BrushSmoke BrushHot Air BalloonStep 1Create a new document sized 1400px * 700px, grab the Gradient Tool and fill the background layer with a light blue gradient:1 grad 500x159 Design an Interesting Cloud Text Effect in PhotoshopClick to enlarge the following screenshot to reveal the colour code:1 fill 500x249 Design an Interesting Cloud Text Effect in PhotoshopUse the cloud brush set you downloaded, paint some white cloud on a new layer and we will use this as our background:1 paint 500x249 Design an Interesting Cloud Text Effect in PhotoshopStep 2We will type some texts onto our canvas, I used the “Lucida Handwriting” font that comes with Photoshop:2 font 500x205 Design an Interesting Cloud Text Effect in PhotoshopLoad the smoke brush into Photoshop and use the following set:2 brush Design an Interesting Cloud Text Effect in PhotoshopPress “F5″ to bring up the brush options window, apply the following setting:Shape Dynamics2 shape dyn Design an Interesting Cloud Text Effect in PhotoshopMake sure you tick the “Smoothing” and “Protect Texture” option.Use the brush, gently paint over the text as shown below, adjust the brush size accordingly:2 paint 500x424 Design an Interesting Cloud Text Effect in Photoshop2 paint 2 500x243 Design an Interesting Cloud Text Effect in PhotoshopTurn off the original text layer, and you will have the following effect:2 effect1 500x168 Design an Interesting Cloud Text Effect in PhotoshopThen on this newly painted cloud layer, apply the following “Bevel and Emboss” layer blending effect:2 bevel 500x359 Design an Interesting Cloud Text Effect in Photoshopand here is the effect so far:2 effect 2 500x163 Design an Interesting Cloud Text Effect in PhotoshopStep 3We will add some retouches to this effect. To make text slightly sharpen, we flatten the image and apply the following “Unsharpen Mask” filter (Filter > Sharpen > Unsharpen Mask):3 unsharp Design an Interesting Cloud Text Effect in PhotoshopWe can paint some cloud under the text, just to make the text look like floating above the cloud:3 paint 500x202 Design an Interesting Cloud Text Effect in Photoshop3 paint 2 500x239 Design an Interesting Cloud Text Effect in PhotoshopLoad the hot air balloon PSD File into Photoshop and add some hot air balloons into the image:3 balloon 500x233 Design an Interesting Cloud Text Effect in PhotoshopFinally we can use the same brush in step 2 to add some extra cloud texture around the text:3 cloud over 500x152 Design an Interesting Cloud Text Effect in Photoshopand here is my final effect: (click to enlarge)cloud text flatten1 500x250 Design an Interesting Cloud Text Effect in PhotoshopThat’s it for this tutorial! Hope you enjoy it and find it useful! Till next time, have a great day!

cloud text effect psd


Clouds Text Effect in Photoshop

Let's take a quick look at the effect that we are about to create in Photoshop. The text will be transformed into a clouds text effect, better said a text that looks like it is made out of clouds. We will only need some simple Photoshop filters so nothing to complicated.
To create a clouds text in Photoshop we need a beautiful blue background to start with. This blue background will be our sky. So create a new layer, fill it with #4db0ff color and name it Sky Layer.
Add a new Text Layer and with the help of the Horizontal Type Tool write your text that you want. I will write "clouds" with Cooper Std font. You can choose whatever font you like, but I think it looks best on round fonts.
If you decide to use another font and you don't know how to install it check out this tutorial Install Font in Photoshop.
Right click on the Text Layer and Convert to Shape the text. Pick the Path Selection Tool, select the letters and move them up and down to look nicer.
Select the Sky Layer and the Text Layer and press CTRL+E to merge the two layers. Go to Filter,Distort and choose Ripple effect with the following settings.
Go to the Filter menu again, this time choose Brush Strokes and from that list pick Spatter effect. The settings are 10 for the Spray Radius and 4 for the Smoothness. You can of course play with this settings to obtain interesting results.
To make the text look more cloudy use the Gaussian Blur filter and you should obtain a similar result.
You can apply the Photoshop Filters that we've use in the previous steps one more time with different settings if you want to distort the text even more. You can also use some clouds brushes for the background to make it look more realistic. Remember that all this little details make the difference.


golden spiral cs4


I am trying to use the shapes tool to draw a few circles which I can eventually turn into the Golden Spiral. I am running into a few problems.

I have guides placed in my file and have it set to snap to guides. The circles that I place always wind up being centered a few pixels away from the guide intersections. Same thing happens when I place rectangles even though I have selected Center as the method for both shapes.
Oh, that is perfect. That maybe all you need for a grid type thing, but to expand upon it for maybe oher things is easy enough. Your Golden Arc [GA] is very similar to the first step of the circle in lesson 4A....
Support file for Lesson 4A (arc.jpg)

...manipulate just that arc in the tutorial, and you will hae the only portion you need. The [GA] can start as a qurter circle....then scale the height only up, to match the true Golden Arc. When that is done with the pen tool, you get optional points. By sliding one point over another, they click perfectly, then you join them in theflyout for paths....Points>join points.


Your ilustrator file may be able to be brought into photoshop as a Path....click in the middle of one arc, and copy....then go to photoshop and paste....you should get a new window asking for import as Path....that is what you want. That will import as if you drew it with the pen tool, and can be added to and manipulated in any ay in photoshop.


That arc image above has the tutorial in the comment, but here is a link to the 3-page tutorial....
Automatic Download of 3-Page tutorial in .PDF format:
Lesson4A: Pen Tool Introduction | PDF file
It will download when you click that link, and there are links within the PDF for full size screen caps and support files. I hope that helps you out some.

Edit to add:
The easiest way for to you use the A and B plots...scale it vertically so it is the exact proportion you need. Follow the same steps athe arc describe in the tutorial in regards to holding the shift key down while dragging. The path you draw will match perfect.

You will need to use the white cursor t join any points...once you have only two selected, the option will be available. That part is explained some in lesson 4a, but more in lesson 4b. Just replace the A for the B in the PDF file link, and it load lesson 4b for you. 

Why is that?

Yes, the Golden Spiral is made from quarter circles that diminish in size by the 1:1.618 proportion.

I have used the Illustrator to build one which I have then exported into PSD so that I can bring into any image and use as approximate cropping guide. 

I like to see your tutorial though. Where can I find it?


Also is there a way to simply specify the pixel location for the center of these shapes? Circle, especially?

Thanks in advance for any suggestions.
Remember too the Golden Spirqal is not a circle. It gains, or loses on every quarter revolution. That can not be done with the circle shape, but can be done with the pen tool. I have a tutorial on how draw a perfect circle with only four points. That part is critical for the spiral to evolve properly. If you draw it like the tutorial, you can precisely move one point, and the bezeir curve will be exact and properly proportioned.

You can plot any point very precisely in photoshop too, you use the x,y plots in the boxes above. The Illustrator spiral applies that formula, but you can also create it simply in photoshop. The spiral is always made up of repeated sections. If you create one revolution of the spiral properly, copying, pasting, and one precise scale will develop the spiral to any degree you want. The points of the pen tool are precise and snap properly to any gude you have placed. If you want the tutorial for the circle, just search my stream for lesson4a. You will see the pages, and each has a link for the pdf of the tutorial.

It may sound hard to draw it that way, but it is actually simple once you learn the pen tool a little. I hope it helps you out some.